
MOGRT and SRT workflows
Graphics Deck User guides
Insert captions from a personal MOGRT library, with separate workflows for SRT-timed placement and applying text to existing graphics.
Mac 1.0.3 · Windows 1.0.3 reference · Updated
Labels may differ depending on the installed version and Premiere language.
IN PRACTICE
Usage guides and recorded examples
Refer to the manual and release notes for current instructions and released versions. The recordings below show the interface at the time of capture, not verification of the latest UI.
01 · Recorded workflow · 124 seconds
Existing public demonstration · recorded version not documented
Graphics Deck: real workflow demonstration
A user-supplied silent recording of design selection, caption insertion, selected properties and preferences.
Read the video walkthrough
This user-supplied recording shows Graphics Deck in use: choosing a design, inserting graphics into a Premiere timeline, and checking text, selected properties, insertion options and preferences. Audio is omitted. The MOGRT designs and media shown are user examples, not included with the base software purchase. Some screens may differ in versions updated after recording.
View earlier-version recordings and screenshots
These preserved examples show real use of earlier versions. Buttons, settings and sign-in requirements may differ today. Select a screenshot to view it at its original size.
01 · Recorded workflow · 29 seconds
Earlier-version reference recording
From choosing a design to inserting captions
A recorded workflow changing text in Graphics Deck and inserting a graphic into the Premiere timeline.
Read the video walkthrough
Select a design from the library. Adjust its text and insertion options in the editor, then choose Insert caption. Check the text in Premiere's Program Monitor and the graphic created on the timeline. The recording shows an earlier version of the interface; some labels may differ by installed version.

Earlier-version reference screenshot
Name-based library
Design categories and SRT tools in a single-row deck. The designs shown are an example user library.
Earlier-version reference screenshot
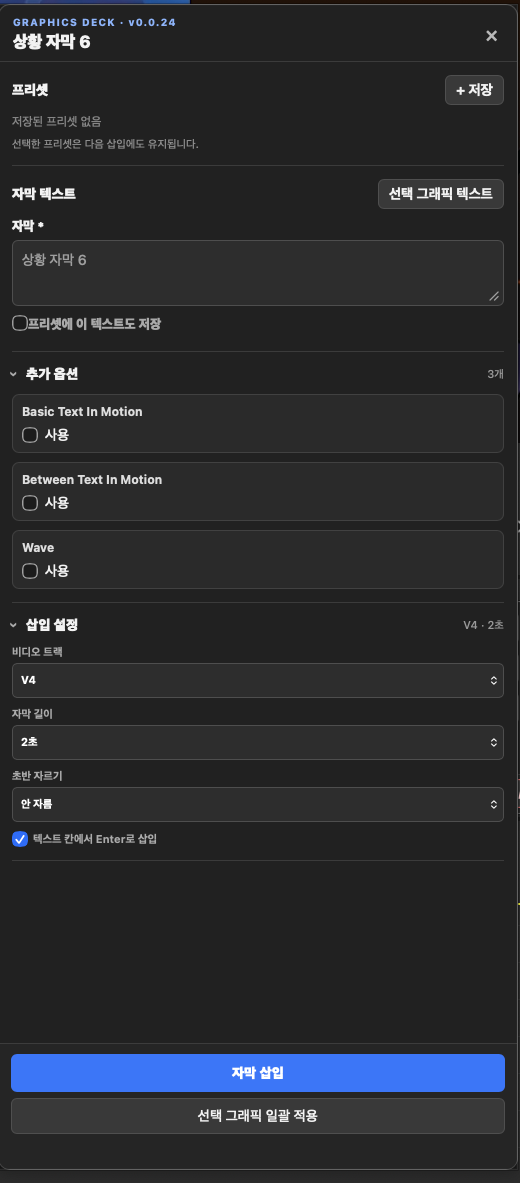
Text, options, and insertion settings
Edit text and options exposed by the MOGRT, then select the target track and caption duration.
Earlier-version reference screenshot
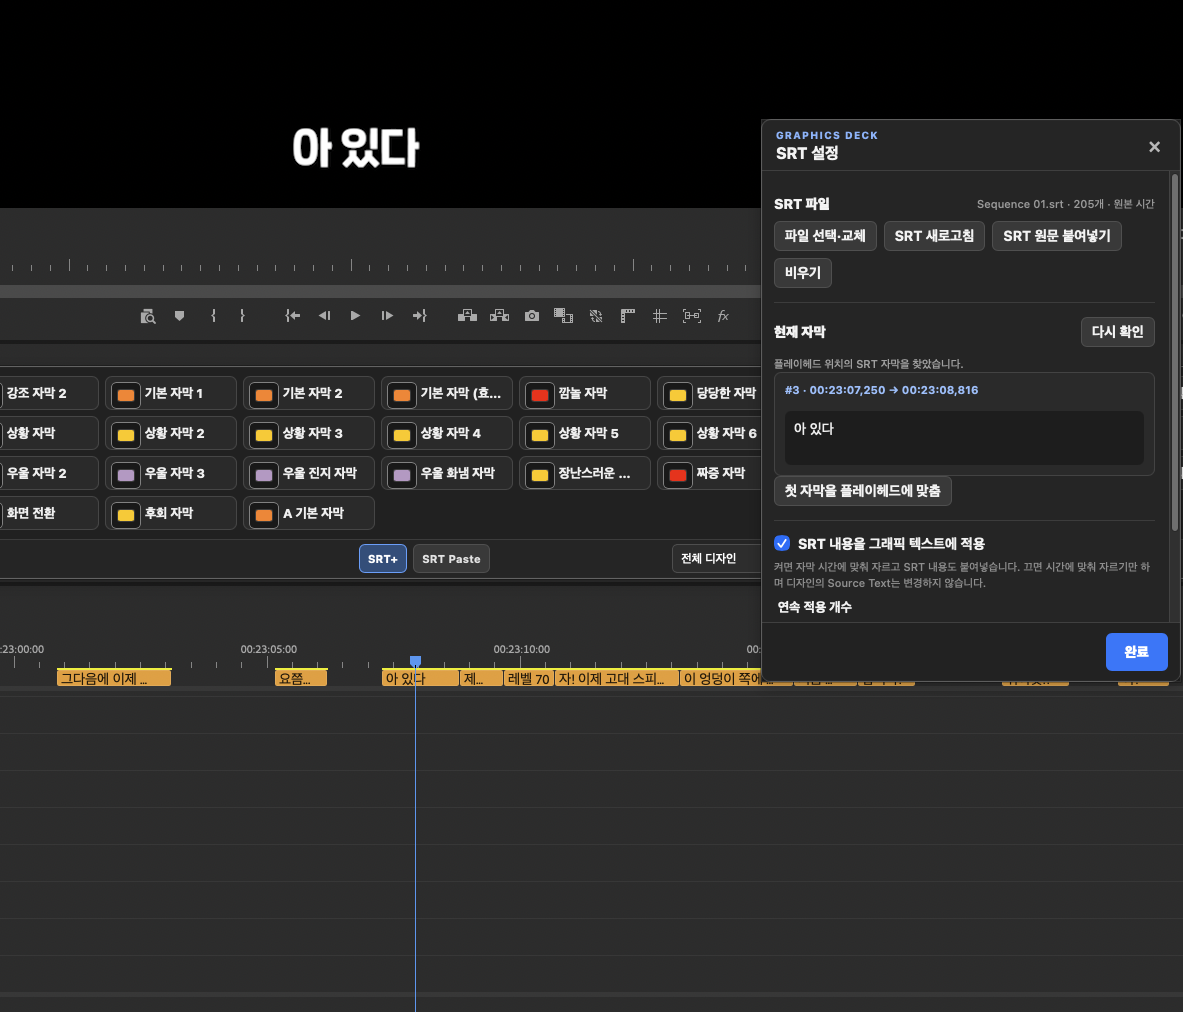
SRT settings and current caption
Review the current cue, text application, and consecutive count. The recording illustrates a workflow; it is not evidence of frame-accuracy verification.

Earlier-version reference screenshot
Thumbnail library
Switch between name and thumbnail views to find designs. This is an example user configuration and may differ from the library edition's 43 basic MOGRTs. The empty-library edition contains no templates.
01
Connecting and adding MOGRTs
- Install Graphics Deck and the shared SEOHA Bridge separately in Product Manager. After installation or updates, fully quit and restart Premiere Pro.
- Open the sequence to work on in Premiere and launch Graphics Deck. Check the Premiere connection using the connection indicator and status text at the bottom.
- Select + at the bottom of Quick Deck to add .mogrt files. An empty-library release initially showing 0 designs is normal.
- Select a design from the list. Only text, color, numeric, and other options exposed by the original MOGRT can be edited.
- Adding to the library also requires a Premiere connection. Prepare any fonts, media, and other external resources used by the MOGRT separately.
- Installing an empty-library release does not automatically delete previously added user libraries.
02
Inserting a single caption
- Place the Premiere playhead at the insertion point.
- Open a design card and check the caption text, exposed options, target V track, and duration.
- Select Insert caption and check the actual timeline result. If a conflict notice appears, check the target track and available space before proceeding.
- With Insert immediately on design click enabled, a short click may insert the design directly. Press and hold the card to ensure the editor opens.
- In settings, you can enable immediate insertion only for designs with no text fields, or place the design editor's text fields at the top or bottom. Automatic trimming of existing clip ends is not provided.
- When Insert caption with Enter is enabled, Enter inserts and Shift + Enter adds a line break. Finish any Korean input composition before inserting.
- Esc does not close the editor while Korean text is being composed. After finishing composition, press Esc again if you want to close the editor.
- In Settings, choose Close editor after insertion and Move playhead after insertion independently. For normal insertion, enabling playhead movement moves it to the end of the inserted graphic; a playhead moved manually during insertion is not overridden.
03
Creating new graphics at SRT times
- Open SRT+ at the bottom and use Select / replace file to load an .srt file, or paste the SRT source text.
- If the SRT and sequence times are offset, place the playhead at the desired start of the first caption and use Align first caption to playhead. This does not modify the original SRT file.
- Place the playhead over the cue to use, then check the current caption, quantity (1–8 or Continuous), and whether Apply SRT text to graphic text is enabled.
- Choose a design and check the text field that will receive the SRT text. The selected field is remembered per design for future SRT insertions; use the selection dialog to change it.
- Check the target track and options, then select Insert caption. The text is placed in the selected field and new MOGRT clips are created at the SRT times.
- Text application ON places SRT text in the selected field; OFF uses only the timing and retains the design's text. A single text field is selected automatically. Designs without text fields use timing only.
- The text target is saved per design. The last selection is reused while the text-field structure stays the same; choose again if that structure changes. Text and settings in unselected fields are preserved.
- Under MOGRT repeat start, Full original starts every insertion at the beginning of the source. Skip first 2 seconds leaves the first source group unchanged and applies to subsequent new source groups. SRT timing and duration are preserved; SRT Paste is unaffected.
- Continuous mode processes the remaining captions in small batches. Canceling stops subsequent processing; graphics already inserted remain. Check the last processed position on the timeline before restarting.
- Once loaded, the SRT is retained across app and Premiere restarts. If you save changes to the source file, reload it with Refresh SRT. Use Finish SRT at the bottom when the task is complete.
- SRT tasks are stored separately for each project and sequence. Check the current SRT after switching sequences, and load the file that matches the edit when starting a new sequence.
- If a start-frame mismatch error appears, first inspect the clips already inserted and the error log. Do not blindly reinsert or shift the entire SRT by one frame.
04
Timing after cuts and finishing an SRT task
- Load into Graphics Deck the SRT exported after editing captions in Premiere. Start with the SRT timing aligned to the current sequence.
- In SRT settings, enable automatic SRT timing adjustment when the timeline becomes shorter. The app records the pre-edit state using video and audio source positions.
- When cuts remove video or audio intervals, the corresponding timing in the app's SRT copy is adjusted. Undo and redo changes are recalculated against the initially recorded reference.
- When finished, click the white Finish SRT button with blue text immediately left of Settings and X in the footer. This ends only the app's SRT task and adjustment history; the source SRT, Premiere C1 captions, and inserted graphics remain unchanged.
- Intervals without captions can still be matched when video or audio continues underneath. The app does not subtract the total timeline reduction from every caption.
- Delays in reconnecting or reading the project do not clear the current SRT. If the app reports that the reference cannot be verified, reload an SRT matching the current edit.
05
Changing only the text of existing graphics with SRT Paste
SRT Paste does not create new graphics. It retains the design, start position, and duration of MOGRTs already placed, and applies SRT text to writable text fields.
- Place the target MOGRTs in Premiere first, then load the SRT to use in SRT+.
- Place the playhead where the first target graphic and current SRT caption actually overlap. Future graphics are not automatically selected from an empty section.
- Click SRT Paste briefly to apply. If several graphics overlap, choose the target using its V-track number and graphic name.
- Press and hold or right-click SRT Paste to change the quantity. Choose 1–8 or Continuous. Continuous processes only targets that can be safely identified on the same track.
06
Editing placed graphics with Control
Select a MOGRT, then use Control to open the properties window and edit text and exposed options. Automatically opening text windows and separate text editing settings are not available.
- Select the MOGRT clip to edit in Premiere, then open the properties window with Control in Graphics Deck.
- Edit only the exposed text or options that need changing. Designs containing only text fields can also be opened.
- When multiple clips are selected, the app checks whether they share the same source design. Only changed fields are applied. No further changes are applied if the selection changes or the source cannot be safely distinguished.
- After editing options, move focus elsewhere to apply the changes. Finish any Korean input composition first.
- Edit text and options together in the manually opened Control properties window. Use the eyedropper icon in the color picker to sample a screen color.
- Properties not exposed by the MOGRT and text fields that cannot be safely identified cannot be edited.
- Presets can also be saved and selected in the Control properties window. Click a preset's X to arm deletion, then click the same X again after at least 0.6 seconds and within 3 seconds to delete.
07
Window movement, saved position, and magnetic alignment
- Free placement
- Drag the window by its title or drag area. The main window remembers a position set manually.
- Settings → Reset main window position
- Moves the window to the center of the current screen without changing its size. If magnetic alignment is enabled, turn it off first and save.
- Magnetic alignment to Bridge Anchor
- Dock Premiere's SEOHA Bridge (Anchor) panel where desired, then enable Automatic Link panel detection / magnetic alignment in Settings. If Graphics Deck briefly hides with a position-check prompt, move the mouse inside the exposed Bridge panel to check again. Unverified coordinates are not applied. This does not turn the app into a native Premiere tab.
- macOS permissions
- If automatic position detection requests Accessibility permission, check the operating-system settings indicated by the app. Free placement remains available without that permission.
- General settings, SRT settings and the editor save only the fields you change. If a save fails or a partial-state warning appears, reopen settings and check the current values, magnet alignment and automatic startup state before retrying.
08
Library, SRT, and connection troubleshooting
- Adding with + fails or a connection error appears
- Check that Premiere and a sequence are open and that Bridge is the latest installed version. Stop repeatedly clicking, inspect the E/C error log, and follow the reconnection steps in the Bridge guide.
- SRT Paste is disabled
- Check that an SRT is loaded, the current cue matches the playhead, and a MOGRT with writable text exists at that position.
- Text is not applied to a Premiere-created MOGRT
- Install Graphics Deck 1.0.3 and Bridge 1.0.0 together, then restart Premiere. Save your project and test a short section first. Support depends on the template structure. Do not move or delete project-related files created during processing.
- Magnetic alignment does not attach, or connecting slows the app
- First turn off magnetic alignment and check free placement. Update both Graphics Deck and Bridge, then restart Premiere. If the issue continues, send both product versions, the Premiere version, and the error log together.
Related guides
Include the product, OS and Premiere versions and the error message when contacting support. Do not send verification codes, session tokens, or original private project files.